build diary
<< | show individual entries | >>July 10, 2004:
Unfortunately, the plans to visit the shop with the mandrel bender fell through.
The bender has been sold. So I'm back to the original plan of cutting up pre-made bends. Too bad. I expect to ruin a few bends while doing this. I've been working on the wiring in the meantime, getting the final switches in place. Once the transmission tunnel gets here (next week, it's on the way) I'll be able to start assembling big chunks of car. I am tempted to put the side panels on one side of the car so that I can fit the rear fender. This means I can also mount the taillights and start finishing up that particular wiring. First I have to figure out which of the rear fenders is which - they're asymmetrical. I have a number of photos of various CMC builds that should help here.
Interesting note - looking through those old CMC photos, it appears they run their exhaust above the diagonal frame member. That's the first routing I tried but I had trouble getting it to work to my satisfaction. It also put the exhaust close to the master cylinders - but without the change I made to the water pump inlet, it would have been the only option. I also notice that CMC had to cut a new hole for the throttle cable bracket ain the Mitty build as well!
entry 435
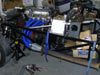 More header mockups.
entry 436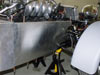 I'm trying to get up the nerve to attach one of the side panels.
If I have to take it off again, it will have to be drilled out.
entry 437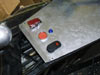 The first of the main switches has been added to the car.
These black rockers will be used for the turn indicators, headlights, high/low switch and the hazards. The others will be placed along the transmission cover. This one is the hazard lights and it's currently turned on - thus the illuminated LED.
entry 438
July 12, 2004:
It seems hard to believe, but I'm running out of things to do!
Or more specifically, there's not much I can do until my transmission cover gets here or the exhaust is done. Lots of small things are done now. The lights work (at least those on the front), the fan is now functioning properly, the rear end has been fully aligned and I've started to attach body panels! The big panels are on the passenger's side now and the car is looking good. The fitment of these panels was almost perfect which is a relief. I even managed to get them on with no visible rivets from the side or top of the car. The driver's side will have to wait until the exhaust is done because I have to cut one of the panels. I have another potential lead for the mandrel bending and I'll investigate that today. This is getting quite exciting although there's still some debugging to do once the car is running.
entry 439
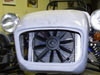 Bug mulcher! I think perhaps a small grille of some sort might be a good idea.
entry 440 Fitting a side panel.
This is going to be a difficult part to remove later as it wraps right over the top rail.
entry 441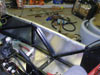 The side panel in place.
It fit almost perfectly.
entry 442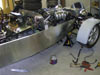 The side of the car.
There is a seam right below the cleco fastener in front of the firewall. CMC puts rivets down here but mine has a very tight fit without them. Good, this makes for a cleaner look.
entry 443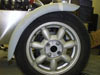 The front fender on an unmodified stay.
entry 444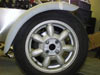 This is where I would like the fender to sit.
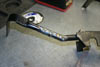
entry 445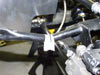 The angle of this stay was all wrong.
A quick pie cut solved that although it still needs to be extended a little.
entry 446
July 13, 2004:
After a lot of running around, I've determined that there aren't any real mandrel benders in town.
After a long talk with a local petrolhead and muffler shop wizard, I've decided to simply use "normal" pipe bends in the first round of my header. It'll be inexpensive, easy and will let me get the car running. Besides, I'm using quite large 1.75" tube for the header instead of the more usual 1.5". Even with the lower quality bends, the tube will never go below 1.5" diameter. Once I'm satisfied, I can cut and weld my own runners out of mandrel U bends.
To this end and following advice given to me, I spent last night carefully bending welding rod into the shapes I need. I have a lot of room to work with and it's a good thing - this is harder than it looks! The bent-up rods were dropped off at the muffler shop this morning and I'll be able to test-fit them tonight. A couple of my bends were too tight for their bender but I do have a few chunks of mandrel U in that radius so I'll just stitch that together.
In other news, I ordered my mirrors last night. I had been looking at the same mirrors we used on the Flyin' Miata "Track Dog" race car but the $80 price tag for a pair had me hesitating. A bit of looking around and I found some motorcycle mirrors that are similar in design for $25 a pair. So they're not quite as easily adjusted. I can deal with that! I was also informed that there's a track day that would be perfect for testing and setup on the 24th. Will I be able to make it? Hard to say. It's a long drive and I'd hate to discover a major problem when I got there. But it honestly would be possible if I wanted to do it...
entry 447
 A modifed front fender stay.
It's been angled up by about 25 degrees and extended by 20 mm.
entry 448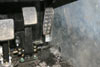 The bias bar control cable was placed a little too low and too far back.
It's much better now. Note the BRG nuts holding the brake pedal down - a little reminder of the donor car.
entry 449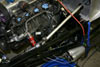 Once the header pipe routing was worked out with the blue hoses, aluminum welding rod was used to finalise the shape.
It's quite an art!
entry 450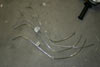 My future header tubes.
entry 451
July 14, 2004:
The header tubes were bent up yesterday.
They still need some modification of course - some of my bends are too close together or too tight to be done without some cutting and welding. Once I had a close look at the tubes, of course, I've started rethinking my decision about mandrel bends. They're not all that complex with only three bends per tube. Maybe I will put my own together out of U bends after all. I'll do some measuring tonight to determine how many I'll need. I've been receiving lots of tips, links to websites and suggestions from folks looking at the site as well - thanks!
entry 452
July 15, 2004:
The transmission cover is here, along with my paperwork for registration!
Woohoo! Unfortunately, this cover doesn't fit either although it's closer. This one's not only too narrow at the front, it's also too short to reach all the way to the floor by about 3/4". Since I have to rivet it to 3/4" tubes, you can imagine this makes it a little difficult to secure into place. Pictures will follow. I've decided to simply press ahead with it because I want this car on the road. I can replace it at a later time - I suspect I'll have to cut my own. This one won't look as good as if it had fit properly. Hopefully people will overlook it because of the rest of the work!
I picked up a pile of mandrel u-bends today. Rodney (when in Grand Junction, get your muffler work done at Scotty's Muffler, owned by Rodney) hasn't charged me yet because he told me "I don't think you're done yet". Hopefully I'll prove him wrong! I also picked up a muffler that should fit in nicely and provide a good sound level.
I also started fitting the rear fenders. CMC has extended the rear section of the frame since mine was made, and one benefit of that would be a better fit of the rear fenders. Still, with some fender welting it should look good. Once they're in place, I'll be able to put the rear lights in and wire them up. A final tweak was also made to one of the front fender supports for a good fit. It's all getting close.
entry 453
July 16, 2004:
Well, the fitment of the transmission cover is worse than I had expected.
It's really not acceptable and looks quite crude. It's a real pity as it will be very obvious to anyone who looks into the car. Since it's the third one CMC shipped to me (although only the second to arrive), it looks like the only way I'll get one to fit will be to make my own. Even if the bends had been in the proper locations the sides of the cover aren't long enough so the program for the plasma cutter isn't right. This is a bit odd - some of the other panels such as the side body panels and the rear bulkhead are spot on. Still, it'll keep stray hands from getting caught in the driveshaft so it will perform the function for the time being.
I spent most of last night fitting body parts. Both rear fenders are on the car and look good. I did have to flex the fibreglass a little to get the proper curvature - hopefully with good attachment this won't result in stress cracks in the future. The rear fenders are nicely placed over the wheels. Now I can put my taillights in. The front fender stays are also finished although I need to check the lateral alignment of one side. As a last project, I also pulled out my good nose cone and installed the Dzus fasteners that will attach it to the frame. The newer nose is heavier than the original one I was sent - it's definitely stronger. I've put one Dzus on each rear corner of the nose and one will go underneath behind the radiator. The car is starting to look pretty cool in my garage now. Maybe that's why I put so many photos up today - 20 of them!
entry 454
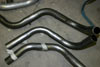 The first version of the header tubes, put together on a tubing bender.
entry 455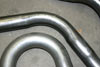 Pipe bender versus mandrel bend.
entry 456 The collection of parts to make my own exhaust system.
entry 457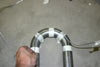 Measuring the bent welding rod against a u-bend to get an idea of how many u's I will need.
entry 458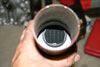 While my muffler looks like a glass pack from the outside, it's actually a real muffler.
entry 459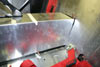 The transmission cover doesn't fit very well at all.
entry 460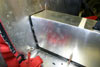 The passenger side of the transmission cover doesn't even reach down to the bottom tube for the transmission tunnel.
The only places it can be attached are where there are upright tubes.
entry 461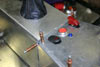 While the rear half of the transmission cover is not visible when the seats are installed, this area is.
entry 462 This is the best alignment I could manage for the aluminum panels on the passenger's side.
It's also very visible once the car is completed.
entry 463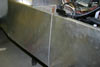 By comparison to the transmission tunnel, here is the fitment of the side body panels.
This seam is so tight it doesn't need any rivets.
entry 464 The rear bulkhead panel was almost perfectly shaped.
entry 465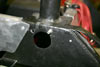 There's a hole drilled in this plate that's right where I wanted to put a bolt to hold on the rear fender.
I suspect the hole is left over from the original Locost frame design, as this is a shock mount in that setup. The bolt hole I had to drill didn't have much room for error. The unoccupied 1/4" hole is inaccessible from the other side - whoops.
entry 466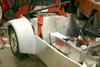 The first rear fender in place.
You can also see the fitment of the transmission cover here.
entry 467 Marking out the location for the taillights.
It's a good thing I had a level or these would have been far off!
entry 468 The front fenders in place.
These will cover a 205 tire but the offset needs to be correct.
entry 469 Using a nibbler to create the holes for the console switches.
This was much easier than I had feared.
entry 470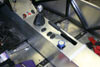 All controls in place!
In front of the gearshift from left: Ignition, starter button, hazard lights. Behind the shifter, turn indicator, headlights, high/low switch and brake bias adjuster. The piece of tape marks out one of the crossbars in the transmission tunnel.
entry 471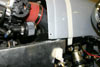 Installing the Dzus fastener for the nose cone.
First, drill a hole through both parts so that the end result is aligned.
entry 472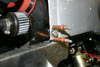 The Dzus fastener temporarily held in place.
The countersunk hole gets quite close to the trailing edge of the nose cone. This recessed lip on the nose really could be 1/2" longer to make this easier to fit.
entry 473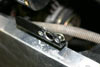 The Dzus spring is riveted in place.
entry 474
<< | show individual entries | >>