build diary
<< | show individual entries | >>January 24, 2004: 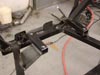 My rack mounts.
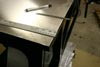
They should be fairly solid and they're certainly light.
entry 72 The rack in place.
I can easily space it up and down for some fine-tuning as I had to guess at the final ride height. I'm also going to use rod ends on the tie rods so I can make adjustments there as well.
entry 73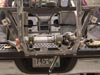 The rack is the perfect width (but the photo is offset!)
entry 74
January 27, 2004:
Every project and race car I've done in the past has involved a hard deadline, whether due to a race or my own goals.
In the case of the Seven I'm deliberately trying to avoid this. Since I'm working at a more relaxed pace, sometimes other projects will get in the way. So on Sunday, after a lot of Seven work the day before, I decided to repaint part of my house and rework a couple of rooms. The frame should get painted in the next few days once I cut the CMC pedal mounts off the floor. It depends how good the skiing is this weekend, really...
entry 75
 By request, a comparison of the front suspension control arms.
The lower arm from the Miata is slightly bent.
entry 76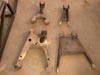 A comparison of the rear suspension control arms.
entry 77
January 30, 2004:
The house is done.
Time to get back to the car. I've spent the last few days working on specifications for the brake system. I had already decided to run with Wilwood pedals and a pair of master cylinders, but first I had to determine the size of the masters. Going with an 0.875" front and 1.00" rear master will give me the same line pressure for the same pedal pressure as a Miata running without power assist. Now, back to painting the frame - and skiing.
entry 78
February 2, 2004:
Good skiing this weekend, but I did take some time to work on the frame.
The old pedal mounts were ground off, I prepped the frame with Metal Etch and then painted it with POR-15. I've used POR before on my Land Rover frame and it's wonderful stuff. It takes a whole lot longer to do a space frame than it does a simple ladder frame, though! I think it took 4 or 5 hours to paint, and that was with two people working on it for part of that time. Going over every inch of the frame with a brush is an excellent way to get familiar with every nook and cranny. Once this coat of paint is dry, I'll flip the frame over and paint the bits that were covered by the sawhorses. Then the diff and floor go on and the assembly will begin!
Steve at CMC tells me he's been hearing from a lot of people about my build. I'm flattered! He wants me to mention that out of 300 crates they've shipped, mine is one of two that was damaged. They're replacing all the damaged parts of course. There's no need to be concerned about CMC's shipping practices.
entry 79
 The underside of the rear lower control arm.
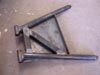
Interesting bracing.
entry 80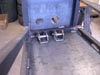 In order to use Wilwood pedals, these brackets have to go.
Too bad, they're solid.
entry 81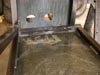 Brackets gone and the frame is prepped for painting.
entry 82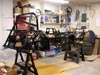 It takes a LONG time to brush-paint a frame like this!
Wow. Now all I need to do is flip the frame upside down and paint the sections covered by the sawhorses.
entry 83
February 3, 2004: 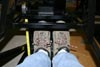 Checking measurements for pedals.
There's not a whole lot of room in here for wide feet wearing hiking boots!
entry 84
February 4, 2004:
I've been asked why I brush-painted my frame instead of spraying it.
Well, POR needs to be sprayed with the proper equipment - which I don't have. You can't buy it in rattle cans at Home Depot.
Flipped the frame over yesterday and finished the painting. Thanks to friends that build airplanes, I have a collection of cleco fasteners so I can do a better job of riveting the floor. Cool! Now I have to go drill a LOT of holes...
entry 85
February 5, 2004:
The floor is on!
I'm now officially Making Progress. It took about 4 hours of measuring, drilling and rivetting to get the panel in place and I was having fun the whole time although the drilling is a bit of a test of endurance. The aluminum floor panel saves about 20 lbs over a welded steel one. There are almost 300 rivets holding it on to the frame. Attention to detail really paid off with a nice clean final result. The cleco fasteners made a huge difference, eliminating any chance of the floor shifting on me and causing headaches - thank you Bill for the loan of the tools! The floor wasn't a perfect fit with about a 1/4" shift from side to side but it wasn't enough to cause any problems. The photos tell the story of how I put the floor on.
CMC has put some time-lapse video of the GRM build on their website. It's the closest thing I have to an instruction manual at the moment and it's also quite entertaining. I particularly like the video of mounting the front control arms. Where is everyone? Is it lunchtime? One guy is working while others stop by to play with the suspension parts once in a while...
entry 86
 Time to rivet on the aluminum floor.
I started with careful measurements.
entry 87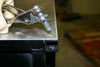 Cleco fasteners were used to hold the floor in place as I started drilling holes.
They're easily removed so I could move them around.
entry 88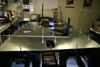 To prevent the floor from shifting or buckling as I drilled, I spaced out the holes.
A series of 5 holes in a row would be drilled in the order 1-5-3-2-4.
entry 89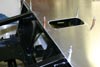 Once the clecos were holding everything down well, I used a centerpunch to locate each hole.
They're 1 inch apart.
entry 90 I just like this photo.
entry 91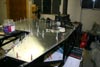 Partway through drilling 300 holes.
I'm moving the clecos around so the panel is well located in the section I'm drilling.
entry 92 Once every hole is drilled, I removed the floor to deburr the holes.
It looks like my measurements were pretty accurate and I hit the middle of the tubes. Whew!
entry 93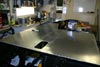 The rivets were installed in the same order as the drilling.
I've only put in every second rivet along the sides as I'll use the others to help hold on the unstressed bodywork.
entry 94
<< | show individual entries | >>